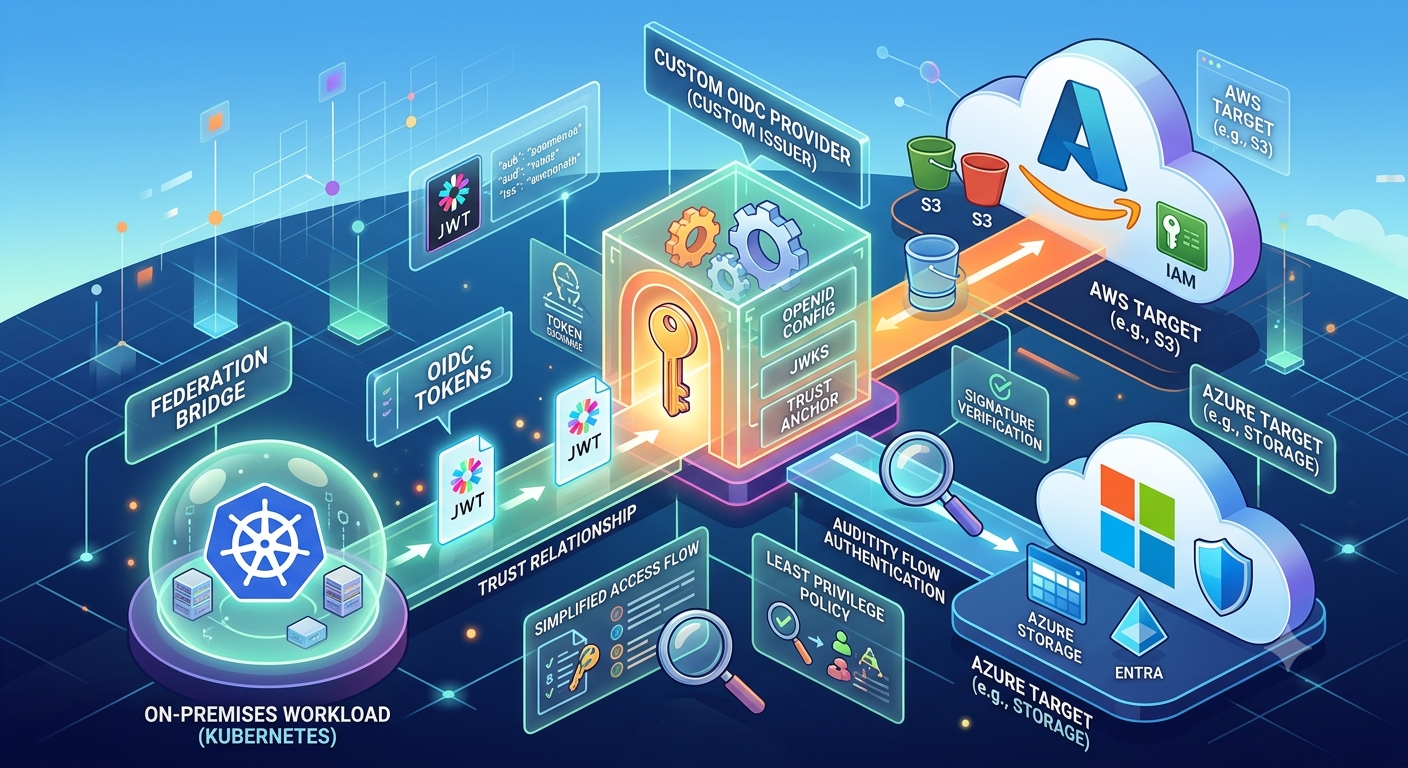
Demystifying Workload Identity Federation: From Custom OIDC to AWS and Azure
In this blog post, we will dive deep into OIDC and WIF.
Let’s say there are three levels of difficulty in workload identity. The first level, which is easier, is to use workload identity in the environment itself. For example, AWS has instance roles, and you can use them as a workload identity. Azure has managed and user identities which can be used as a workload identity.
The second level is cross-cloud workload identity federation, which is now easy to set up but previously was a little tricky. For example, Azure uses the OAuth2 protocol, so it is easy to set up OIDC in AWS for workload identity federation from an Azure VM to AWS S3. But because AWS uses SigV4, it was not easy to set up OIDC or SAML in Azure to have workload identity federation from an EC2 instance to a Storage Blob, for example. The good news is that AWS now supports “outbound identity federation,” and you can easily set up WIF to Azure.
The hardest is Level 3, when you want to have workload identity federation from on-prem to cloud providers. In this blog, we will manually create a workload identity federation, and after we have deep knowledge of OIDC and WIF, we will federate an on-prem Minikube workload pod to the cloud in AWS and Azure as an example.
Building the Core: Keys, Tokens, and Discovery Endpoints
Let’s begin. For OIDC, we first need to have a private and a public key pair. Let’s create them with the following commands:
openssl genrsa -out oidc_private.pem 2048
openssl rsa -in oidc_private.pem -pubout -out oidc_public.pem
import jwt
import time


with open("oidc_private.pem", "rb") as key_file:
    private_key = key_file.read()


payload = {
    "iss": "https://your-domain",
    "sub": "user_123",
    "aud": "my_client_id",
    "iat": int(time.time()),
    "exp": int(time.time()) + 3600
}


token = jwt.encode(
    payload,
    private_key,
    algorithm="RS256",
    headers={"kid": "my-key-id-1"}
)

print(token)
with open("oidc-token.jwt", "w") as out_file:
    out_file.write(token)
Now, let’s print our JWT and check if it is valid on jwt.io, where we can verify it by passing our token and public key.
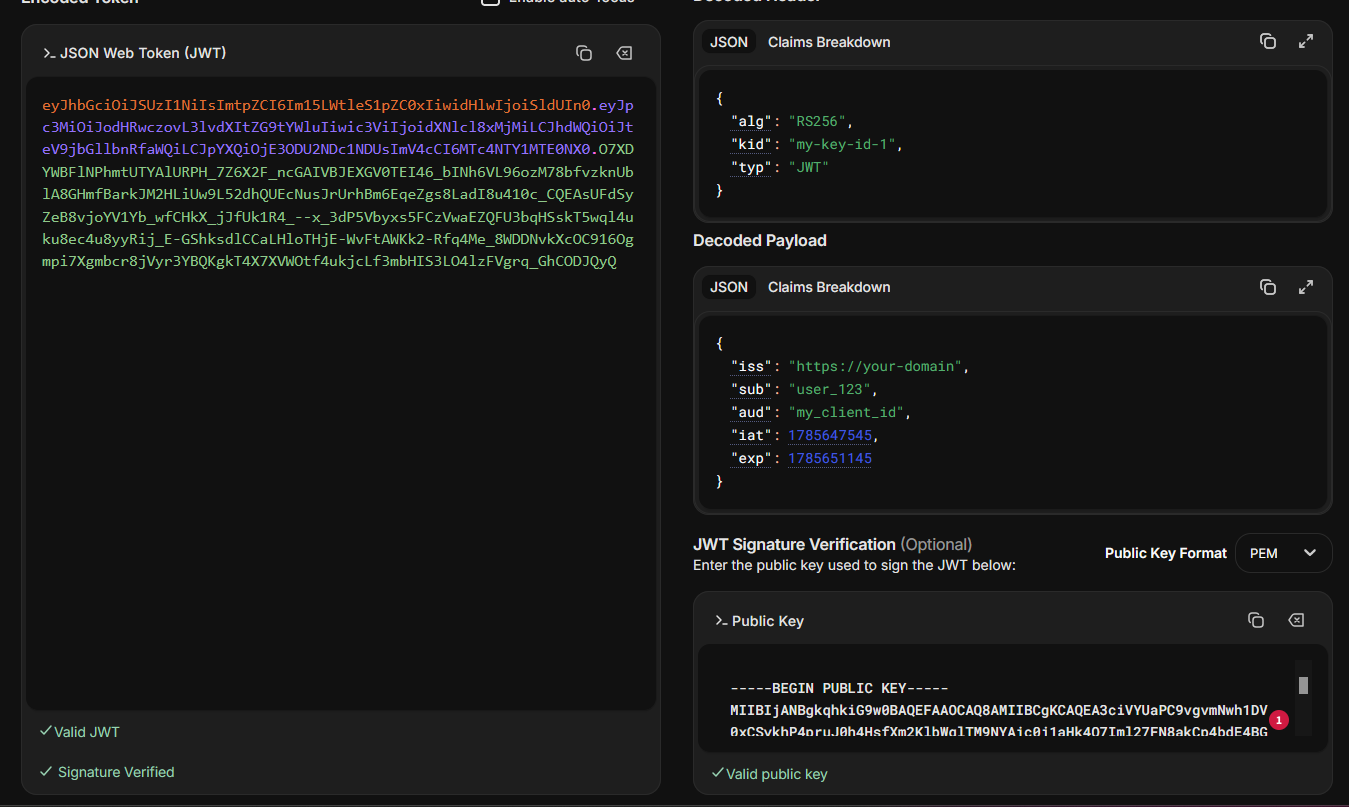
As you can see, our JWT token is valid.
Let’s briefly explain what the code does.
This Python script generates a signed OpenID Connect (OIDC)-style JSON Web Token (JWT) using an RSA private key. It first loads the private key from oidc_private.pem, then creates a JWT payload containing standard claims such as the issuer (iss), subject (sub), audience (aud), issued-at time (iat), and expiration time (exp), making the token valid for one hour. The payload is then signed with the RS256 algorithm, and a kid (Key ID) is added to the JWT header so that verifiers can identify the corresponding public key. Finally, the script prints the generated token to the console and saves it to oidc-token.jwt, allowing it to be used later for authentication or testing OIDC-compatible systems.
The next step in creating our OIDC setup is defining the discovery endpoints. We need the jwks.json and openid-configuration files. For example:
https://your-domain.com/.well-known/openid-configuration
{
  "issuer": "https://your-domain.com",
  "jwks_uri": "https://your-domain.com/.well-known/jwks.json",
  "response_types_supported": ["code"],
  "subject_types_supported": ["public"],
  "id_token_signing_alg_values_supported": ["RS256"]
}
and https://your-domain.com/.well-known/jwks.json
{
  "keys": [
    {
      "kty": "RSA",
      "alg": "RS256",
      "use": "sig",
      "kid": "my-key-id-1",
      "n": "v8w...",
      "e": "AQAB"
    }
  ]
}
The OpenID Connect Discovery document (/.well-known/openid-configuration) is a metadata file that describes an OIDC provider and tells clients how to interact with it. It specifies the provider’s unique identifier (issuer), the location of its JSON Web Key Set (jwks_uri), the supported OAuth 2.0 response types, the subject identifier type, and the signing algorithms used for ID tokens. Rather than hardcoding these values, applications can retrieve this document to automatically discover the provider’s configuration.
The JSON Web Key Set (JWKS) (/.well-known/jwks.json) contains the public cryptographic keys that clients use to verify JWT signatures issued by the provider. Each key includes information such as the key type (kty), signing algorithm (alg), intended use (use), a unique key identifier (kid), and the RSA public key components (n for the modulus and e for the exponent). When a client receives a JWT, it matches the token’s kid with the corresponding key in the JWKS and uses the public key to verify that the token was signed by the trusted issuer and has not been modified.
Custom OpenID Connect (OIDC) identity provider
In this section, we will build a minimal, custom OpenID Connect (OIDC) identity provider from scratch to understand how OIDC discovery and token generation work under the hood. We’ll start by setting up a local web directory to host our standard OIDC configuration files, including dynamically injecting an actual RSA public key into our JSON Web Key Set (JWKS). Next, we will write a Python script that uses a private key to generate and securely sign a valid JSON Web Token (JWT). Finally, we will serve these metadata files using a local HTTP server and expose our custom Identity Provider to the internet using a secure reverse SSH tunnel, making it ready to be tested with real OIDC clients.
Step-by-Step Guide
- Create the web directory
mkdir web/ && cd web/
This command creates a new directory named web to host our static web files and immediately navigates into it. 2. Create the index page
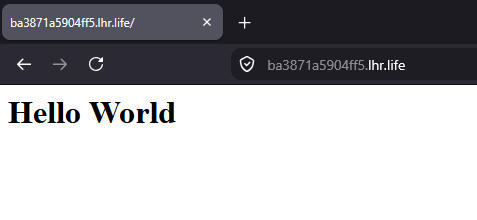
cat <<EOF>index.html
<h1>Hello World</h1>
EOF
Here, we create a simple index.html file to serve as the default root page of our local web server to verify that it is running correctly. 3. Set up the well-known directory
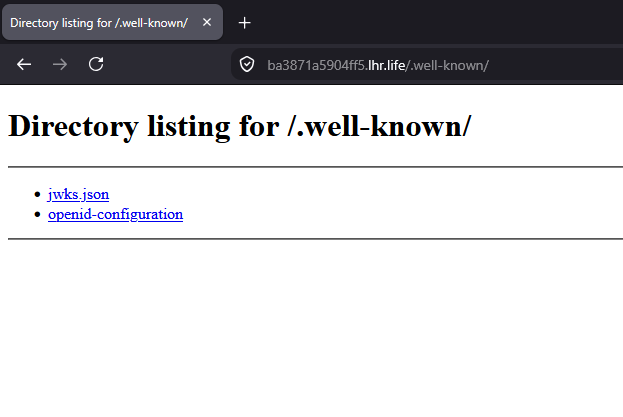
mkdir .well-known && cd .well-known
This creates a .well-known directory, which is a standardized location used by web protocols (like OIDC) to host discovery metadata, and moves us into it. 4. Initialize the JWKS file
cat <<EOF>jwks.json
{
  "keys": [
    {
      "kty": "RSA",
      "alg": "RS256",
      "use": "sig",
      "kid": "my-key-id-1",
      "n": "pubkey",
      "e": "AQAB"
    }
  ]
}
EOF
This generates a placeholder jwks.json (JSON Web Key Set) file. This file will publicly expose the cryptographic keys that client applications need to verify our signed JWTs. 5. Create the OIDC discovery document
cat <<EOF>openid-configuration
{
  "issuer": "https://your-domain.com",
  "jwks_uri": "https://your-domain.com/.well-known/jwks.json",
  "response_types_supported": ["code"],
  "subject_types_supported": ["public"],
  "id_token_signing_alg_values_supported": ["RS256"]
}
EOF
This creates the core OIDC discovery document (openid-configuration). It defines our provider’s metadata, including the issuer URL and where to find the JWKS file, allowing OIDC clients to configure themselves automatically. 6. Inject the real Public Key into JWKS
PUBKEY=$(openssl rsa -pubin -in ../../oidc_public.pem -modulus -noout | \
  sed 's/Modulus=//' | \
  xxd -r -p | \
  base64 | \
  tr -d '\n=' | \
  tr '+/' '-_')

sed -i "s|\"n\": \".*\"|\"n\": \"$PUBKEY\"|" jwks.json
This block extracts the raw RSA modulus from an existing public key (oidc_public.pem), converts it into the strict Base64URL-encoded format required by the JWKS standard, and automatically replaces the “pubkey” placeholder in our jwks.json file with this real value. 7. Return to the root directory
cd ../../
This simply navigates back up two levels to our main project directory. 8. Create the JWT Generation Script
cat <<EOF>main.py
import jwt
import time


with open("oidc_private.pem", "rb") as key_file:
    private_key = key_file.read()


payload = {
    "iss": "https://your-domain.com",
    "sub": "user_123",
    "aud": "my_client_id",
    "iat": int(time.time()),
    "exp": int(time.time()) + 3600
}


token = jwt.encode(
    payload,
    private_key,
    algorithm="RS256",
    headers={"kid": "my-key-id-1"}
)

print(token)
with open("oidc-token.jwt", "w") as out_file:
    out_file.write(token)
EOF
This creates a Python script (main.py) that reads our private key to generate and securely sign a valid JSON Web Token (JWT). The token includes standard OIDC claims such as the issuer (iss), subject (sub), audience (aud), and expiration time (exp). The output is printed to the console and saved locally as oidc-token.jwt. 9. Start the local web server
python3 -m http.server -d web
This starts Python’s built-in HTTP server on the default port 8000, serving the contents of our web directory (which includes our newly created .well-known configuration files). 10. Expose the server to the internet
ssh -R 80:localhost:8000 nokey@localhost.run
This command uses localhost.run to create a reverse SSH tunnel. It bridges our locally hosted port 8000 to the public internet, allowing external applications to reach our custom OIDC discovery endpoints globally. 11. Update the placeholder domain with the real tunnel URL
find . -type f -exec sed -i 's|https://your-domain.com|https://39b6e51d1f0bb8.lhr.life|g' {} +
This command performs a bulk find-and-replace across all files in our project directory and its subdirectories. It uses find to locate every file and securely passes them to sed, which executes an in-place replacement. It swaps our initial placeholder (https://your-domain.com) with the live, publicly accessible URL provided by our SSH tunnel (https://39b6e51d1f0bb8.lhr.life), ensuring our OIDC discovery documents and JWT payload correctly point to the active server.
AWS Identity providers
- Register the Identity Provider in AWS IAM
aws iam create-open-id-connect-provider \
    --url "https://39b6e51d1f0bb8.lhr.life" \
    --client-id-list "my_client_id"
This AWS CLI command formally registers our locally hosted, tunneled OIDC provider within AWS Identity and Access Management (IAM).
- The –url parameter points to our live tunnel address where AWS will look for the .well-known/openid-configuration discovery document.
- The –client-id-list corresponds to the audience (aud) claim we defined in our Python JWT generation script (my_client_id).
- Define the strict IAM Trust Policy
cat <<EOF>trust-policy.json
{
  "Version": "2012-10-17",
  "Statement": [
    {
      "Effect": "Allow",
      "Action": "sts:AssumeRoleWithWebIdentity",
      "Principal": {
        "Federated": "arn:aws:iam::275956877278:oidc-provider/39b6e51d1f0bb8.lhr.life"
      },
      "Condition": {
        "StringEquals": {
          "39b6e51d1f0bb8.lhr.life:aud": "my_client_id",
          "39b6e51d1f0bb8.lhr.life:sub": "user_123"
        }
      }
    }
  ]
}
EOF
In this step, we generate an IAM trust policy document (trust-policy.json). This JSON tells AWS exactly who is allowed to assume our upcoming IAM role. We map the Principal to the OIDC provider we registered in the previous step. More importantly, we use the Condition block to enforce strict access control: it ensures that AWS will only grant temporary credentials if the incoming JWT has an audience (aud) matching my_client_id AND the subject claim (sub) is exactly user_123. 3. Create the IAM Role and Attach Permissions
aws iam create-role \
    --role-name OIDC_S3_ReadOnly_Role \
    --assume-role-policy-document file://trust-policy.json

aws iam attach-role-policy \
    --role-name OIDC_S3_ReadOnly_Role \
    --policy-arn arn:aws:iam::aws:policy/AmazonS3ReadOnlyAccess
Now we execute two AWS CLI commands to finalize our cloud setup. The first command creates a new IAM Role named OIDC_S3_ReadOnly_Role and attaches the trust relationships we just defined in our local JSON file. The second command attaches the AWS-managed AmazonS3ReadOnlyAccess policy to this role. As a result, when our specific user (user_123) authenticates via our custom OIDC provider, they will receive temporary AWS credentials that explicitly grant them read-only access to S3 buckets, adhering to the principle of least privilege. 4. Generate the signed JWT
python3 main.py
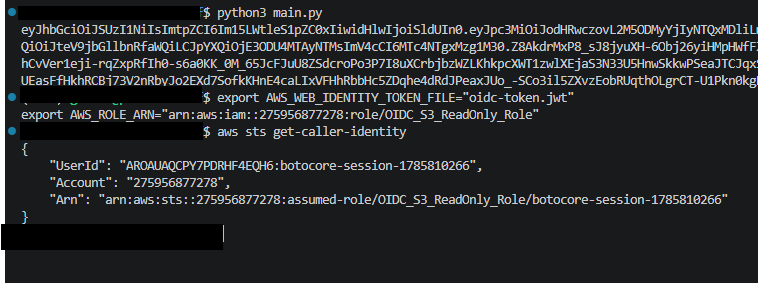
By executing our previously created Python script, we generate a fresh JSON Web Token (JWT). The script signs the token using our local private key, embeds the necessary OIDC claims (such as sub: user_123 and aud: my_client_id), prints the output to the console for verification, and successfully writes it to a local file named oidc-token.jwt. 5. Configure AWS CLI via Environment Variables
export AWS_WEB_IDENTITY_TOKEN_FILE="oidc-token.jwt"
export AWS_ROLE_ARN="arn:aws:iam::275956877278:role/OIDC_S3_ReadOnly_Role"
Instead of making manual API calls to the AWS Security Token Service (STS) to exchange our token for temporary credentials, we can take advantage of the AWS CLI’s native support for web identity federation. By exporting these two environment variables, we instruct the AWS tools to automatically look at our generated oidc-token.jwt file and attempt to assume the OIDC_S3_ReadOnly_Role. The AWS CLI will seamlessly handle the token exchange process in the background for any subsequent commands we run.
Azure Federated credentials
Now that we have successfully demonstrated how to assume an AWS IAM role using our custom OIDC identity provider, let’s explore how to achieve the exact same mechanism in Microsoft Azure. Azure handles this via “Workload Identity Federation.” Instead of an IAM Role, we will create a User-Assigned Managed Identity, grant it read-only permissions, and then attach a Federated Identity Credential. This credential acts like our AWS Trust Policy: it tells Azure to trust our custom OIDC issuer and only grant access if the token’s subject and audience exactly match our predefined strict criteria.
- Create an Azure Resource Group
az group create \
    --name OIDCDemoGroup \
    --location eastus
First, we create a logical container called a Resource Group. This gives us a safe, isolated scope to apply our read-only permissions later without affecting the rest of the Azure subscription. 2. Create a User-Assigned Managed Identity
az identity create \
    --name OIDC-ReadOnly-Identity \
    --resource-group OIDCDemoGroup
In Azure, a User-Assigned Managed Identity serves a very similar purpose to an AWS IAM Role. This command creates the identity that our external OIDC token will eventually assume. 3. Assign Read-Only Permissions to the Identity
PRINCIPAL_ID=$(az identity show --name OIDC-ReadOnly-Identity --resource-group OIDCDemoGroup --query principalId -o tsv)
SUBSCRIPTION_ID=$(az account show --query id -o tsv)

az role assignment create \
    --assignee "$PRINCIPAL_ID" \
    --role "Reader" \
    --scope "/subscriptions/$SUBSCRIPTION_ID/resourceGroups/OIDCDemoGroup"
Here, we extract the newly created identity’s Principal ID and our Azure Subscription ID. We then assign the built-in “Reader” role to our identity, but restrict its scope strictly to our OIDCDemoGroup resource group. This is the Azure equivalent of attaching the AmazonS3ReadOnlyAccess policy in AWS. 4. Create the Federated Identity Credential
az identity federated-credential create \
    --name MyOIDCTrust \
    --identity-name OIDC-ReadOnly-Identity \
    --resource-group OIDCDemoGroup \
    --issuer "https://39b6e51d1f0bb8.lhr.life" \
    --subject "user_123" \
    --audiences "my_client_id"
This is the most critical step and serves as the Azure equivalent of the AWS Trust Policy. We are explicitly linking our custom OIDC provider to the Managed Identity. By defining the –issuer, –subject, and –audiences, we instruct Azure to fetch the public keys from our tunnel URL and ensure that it only issues a session if the incoming JWT specifically belongs to user_123 and is intended for my_client_id. 5. Generate the signed JWT
python3 main.py
generate a fresh JSON Web Token (JWT). 6. Authenticate to Azure CLI using the JWT
CLIENT_ID=$(az identity show --name OIDC-ReadOnly-Identity --resource-group OIDCDemoGroup --query clientId -o tsv)
TENANT_ID=$(az account show --query tenantId -o tsv)

az login --service-principal \
    --username "$CLIENT_ID" \
    --tenant "$TENANT_ID" \
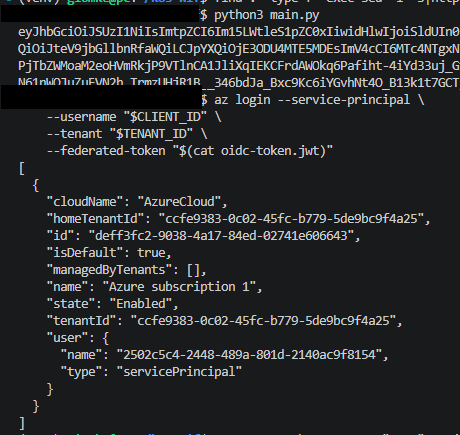
    --federated-token "$(cat oidc-token.jwt)"
Finally, we put our token to use! We extract the Client ID of our Managed Identity and the Azure Tenant ID. Then, we use the az login command with the –federated-token flag, reading our locally signed oidc-token.jwt file. Azure will reach out to our custom OIDC discovery URL, validate the RSA signature using our hosted public key, verify the claims, and successfully log us into the Azure CLI with read-only permissions.
App Registrations vs. Managed Identities for OIDC
It is worth noting that Azure allows you to configure Workload Identity Federation not only on Managed Identities (as we did above) but also directly on App Registrations (Service Principals). If you are wondering which method to choose, the general recommendation is to stick with User-Assigned Managed Identities for standard Role-Based Access Control (RBAC) to Azure resources. They are lightweight, localized to your directory, and simpler to manage without the overhead of enterprise application properties. However, you should choose an App Registration if your external CI/CD pipeline or custom application requires access to directory-level APIs (such as Microsoft Graph), needs to expose its own custom API scopes, or must be configured as a multi-tenant application.
Federating On-Premises Kubernetes Workloads to AWS
In this section, we will establish a secure Workload Identity Federation from a local Kubernetes cluster (Minikube) to AWS. Instead of embedding long-lived AWS credentials inside our cluster, we will configure Minikube to act as an OIDC Identity Provider (IdP). By hosting the cluster’s discovery documents on our public tunnel, AWS can actively verify the cryptographic signatures of our Kubernetes Service Account tokens, granting our Pods temporary, least-privilege access to AWS resources.
- Configure Minikube as an OIDC Issuer
minikube start \
--extra-config=apiserver.service-account-issuer=https://39b6e51d1f0bb8.lhr.life \
--extra-config=apiserver.service-account-jwks-uri=https://39b6e51d1f0bb8.lhr.life/.well-known/jwks.json
First, we must start (or update) our Minikube cluster with specific API server flags. These parameters instruct Kubernetes to embed our public tunnel URL as the issuer within all newly generated Service Account tokens and point to where the public keys (JWKS) are hosted. 2. Extract and Host Kubernetes OIDC Metadata
kubectl get --raw /.well-known/openid-configuration
kubectl get --raw /openid/v1/jwks
For AWS to trust our cluster, it needs to access our OIDC configuration and public keys over the internet. Run the commands above to extract the cluster’s auto-generated metadata. You can then copy the output of these commands and save them directly into your local web server’s web/.well-known/openid-configuration and web/.well-known/jwks.json files. Since our local directory is exposed via the SSH tunnel, AWS can now resolve our cluster’s OIDC metadata publicly. 3. Register the Kubernetes Cluster as an Identity Provider in AWS
aws iam create-open-id-connect-provider \
    --url "https://39b6e51d1f0bb8.lhr.life" \
    --client-id-list "https://39b6e51d1f0bb8.lhr.life"
Next, we map our Kubernetes cluster to AWS. This command creates a new OIDC Provider entity in AWS IAM. We use our public tunnel address for both the provider URL and the client ID (audience). 4. Create a Strict IAM Trust Policy and Role
cat <<EOF>kube-policy.json
{
  "Version": "2012-10-17",
  "Statement": [
    {
      "Effect": "Allow",
      "Action": "sts:AssumeRoleWithWebIdentity",
      "Principal": {
        "Federated": "arn:aws:iam::275956877278:oidc-provider/39b6e51d1f0bb8.lhr.life"
      },
      "Condition": {
        "StringEquals": {
          "39b6e51d1f0bb8.lhr.life:aud": "https://39b6e51d1f0bb8.lhr.life",
          "39b6e51d1f0bb8.lhr.life:sub": "system:serviceaccount:default:aws-tester-sa"
        }
      }
    }
  ]
}
EOF
We define a Trust Policy to enforce strict access control. The Condition block acts as our security boundary: it ensures that AWS will only allow the exchange of temporary credentials if the incoming Kubernetes token specifically belongs to the aws-tester-sa Service Account running in the default namespace.
aws iam create-role \
    --role-name OIDC_Minikube_S3_ReadOnly_Role \
    --assume-role-policy-document file://kube-policy.json

aws iam attach-role-policy \
    --role-name OIDC_Minikube_S3_ReadOnly_Role \
    --policy-arn arn:aws:iam::aws:policy/AmazonS3ReadOnlyAccess
With the policy defined, we create the actual IAM role (OIDC_Minikube_S3_ReadOnly_Role) and attach the AWS-managed AmazonS3ReadOnlyAccess policy to it, ensuring our Pod only receives the exact permissions it needs.
- Deploy a Test Pod with the Service Account
cat <<EOF>aws-pod.yaml
apiVersion: v1
kind: ServiceAccount
metadata:
  name: aws-tester-sa
  namespace: default
---
apiVersion: v1
kind: Pod
metadata:
  name: aws-cli-tester
  namespace: default
spec:
  serviceAccountName: aws-tester-sa
  containers:
  - name: aws-cli
    image: amazon/aws-cli:latest
    command: ["sleep", "3600"]
    env:
    - name: AWS_ROLE_ARN
      value: "arn:aws:iam::275956877278:role/OIDC_Minikube_S3_ReadOnly_Role"
    - name: AWS_WEB_IDENTITY_TOKEN_FILE
      value: "/var/run/secrets/kubernetes.io/serviceaccount/token"
EOF

kubectl apply -f aws-pod.yaml
We deploy our test environment using the YAML manifest above. This creates our authorized aws-tester-sa Service Account and launches a Pod containing the AWS CLI. Notice the environment variables: Kubernetes automatically projects a signed OIDC token into the container at the path specified by AWS_WEB_IDENTITY_TOKEN_FILE, and we tell the AWS SDK which role to assume via AWS_ROLE_ARN.
- Verify Federation Access
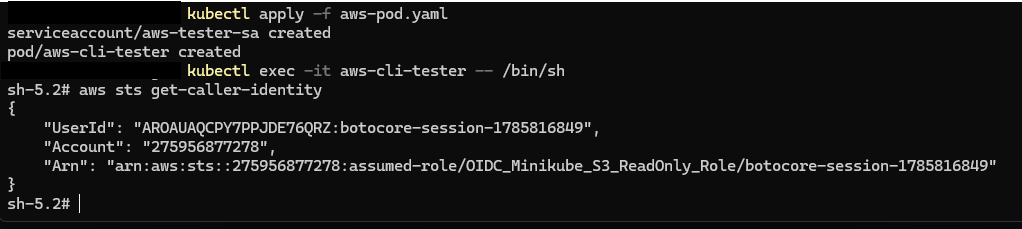
kubectl exec -it aws-cli-tester -- /bin/sh

# Inside the pod's shell, run:
aws sts get-caller-identity
To validate our entire pipeline, we open an interactive shell inside our running Pod and execute aws sts get-caller-identity. Because the environment variables are set, the AWS CLI automatically reads the projected Kubernetes Service Account token and federates with AWS STS. If configured correctly, this command will return a JSON object confirming that your Pod has successfully assumed the OIDC_Minikube_S3_ReadOnly_Role!
Conclusion
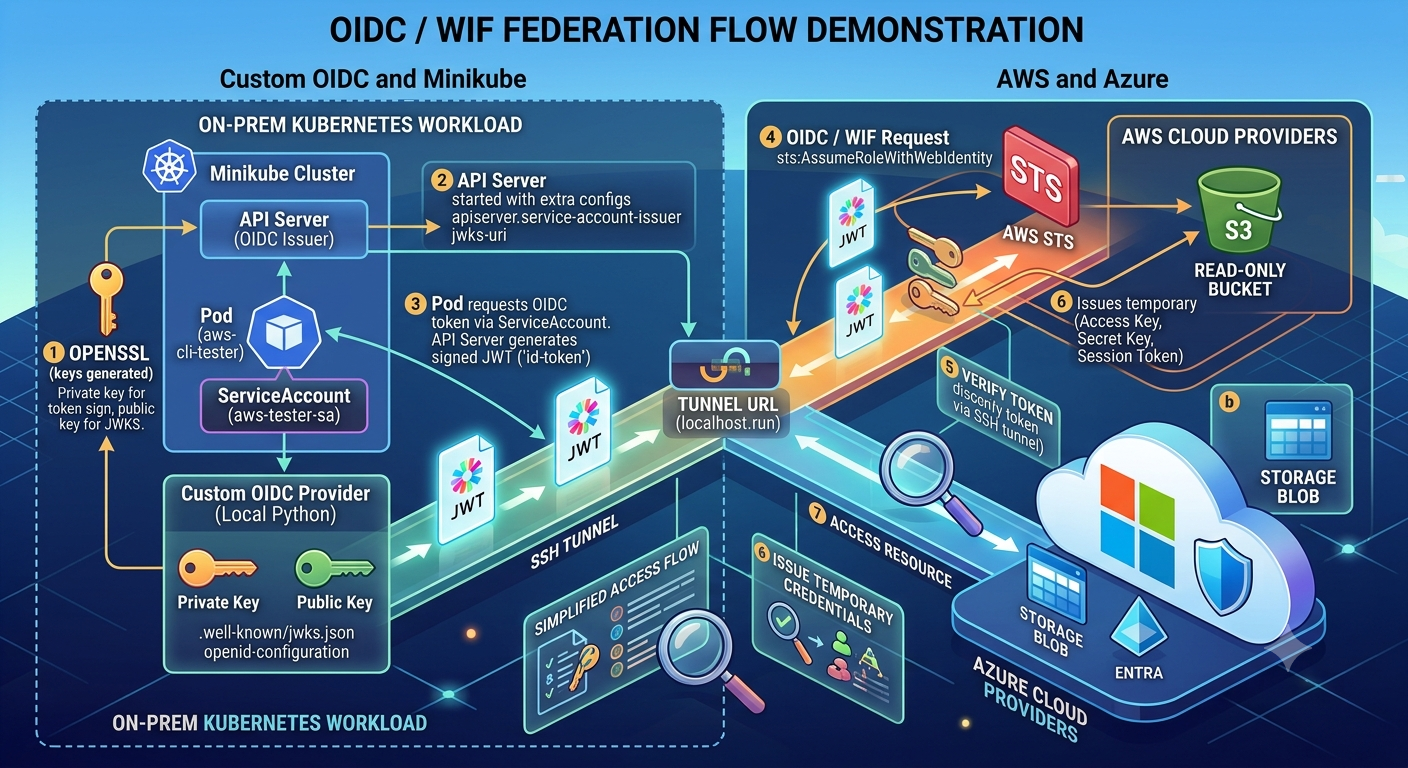
In this blog post, we tackled the “Level 3” difficulty of Workload Identity Federation, moving from the foundational concepts of OIDC to successfully federating an on-premises Minikube workload to both AWS and Azure. By manually creating our own OIDC provider, generating JWTs with Python, and setting up the discovery endpoints (jwks.json and openid-configuration), we gained a deep, under-the-hood understanding of how cloud providers establish trust and verify external identities.
IMPORTANT SECURITY WARNING: STRICTLY FOR DEMONSTRATION PURPOSES It is absolutely critical to understand that the setup demonstrated in this post is purely educational. Do NOT, under any circumstances, use this custom, manually built OIDC provider in a production environment.
The examples provided here are designed to demystify how the protocol works behind the scenes. However, managing private keys manually via scripts, hosting static discovery files without proper infrastructure, and lacking essential security controls—such as automated key rotation, token revocation, and rigorous audit logging—introduce severe security vulnerabilities.
In a real-world, production scenario, attempting to build and maintain your own identity provider from scratch puts your entire cloud infrastructure at risk.
For production workloads, you must always rely on established, enterprise-grade Identity Providers (IdPs) and secret management systems. Solutions like managed Kubernetes Service Account Token Issuers (e.g., IRSA in AWS, Azure Workload Identity), HashiCorp Vault, Microsoft Entra ID, or AWS IAM Identity Center are specifically designed to handle the rigorous security, high availability, and lifecycle management required to keep your cross-environment workloads secure. Keep experimenting and learning in your local labs, but always leave production security to battle-tested tools!